Repair Canon LBP6750dn Printer Error Codes Canon Servie Tool
– Printer model: Canon LBP6750dn
– Error codes on Canon LBP6750dn model and its description:

– Canon LBP6750dn printer Error Codes and quick guide to troubleshooting:
- Code: E000 0000
- Description: Fixing startup failure
- Solutions: 1) Reconnect the connector on the Engine Controller PCB. 2) Turn OFF the power supply switch, and remove the Fixing Assembly. Measure the resistance value between the connector (FSRTH) at the Fixing Assembly side and grounding. If the resistance value is not between 368k ohm and 512k ohm (normal temperature), replace the Fixing Assembly. 3) If the connector at the Fixing Assembly side does not have induction while the assembly is removed, replace the assembly. 4) Replace the Engine Controller PCB.
- Code: E001 0000
- Description: Abnormal high temperature in fixing (The main thermistor detected a temperature of higher than 255 degree C.)
- Solutions: 1) Reconnect the connector on the Engine Controller PCB. 2) Turn OFF the power supply switch, and remove the Fixing Assembly. Measure the resistance value between the connector (FSRTH) at the Fixing Assembly side and grounding. If the resistance value is 1k ohm or lower, replace the Fixing Assembly. 3) Replace the Engine Controller PCB.
- Code: E001 0001
- Description: Abnormal high temperature in fixing (The sub thermistor detected a temperature of higher than 290 degree C.
- Solutions: 1) Reconnect the connector on the Engine Controller PCB. 2) Turn OFF the power supply switch, and remove the Fixing Assembly. Measure the resistance value between the connector (FSRTH) at the Fixing Assembly side and grounding. If the resistance value is 1k ohm or lower, replace the Fixing Assembly. 3) Replace the Engine Controller PCB.
- Code: E003 0000
- Description: Abnormal low temperature in fixing (The main thermistor detected a temperature of lower than 120 degree C for more than 1 second when 20 seconds elapsed after start of the power distribution to the heater.)
- Solutions: 1) Reconnect the connector on the Engine Controller PCB. 2) Turn OFF the power supply switch, and remove the Fixing Assembly. Measure the resistance value between the connector (FSRTH) at the Fixing Assembly side and grounding. If the resistance value is not between 368k ohm and 512k ohm (normal temperature), replace the Fixing Assembly. 3) If there is no induction between the connector (ACN) at the Fixing Assembly side and the connector (ACH) while the assembly is removed, replace the assembly. 4) Replace the Engine Controller PCB.
- Code: E003 0001
- Description: Abnormal low temperature in fixing (The sub thermistor detected a temperature of lower than 80 degree C for more than 2 seconds when 20 seconds elapsed after start of the power distribution to the heater.)
- Solutions: 1) Reconnect the connector on the Engine Controller PCB. 2) Turn OFF the power supply switch, and remove the Fixing Assembly. Measure the resistance value between the connector (FSRTH) at the Fixing Assembly side and grounding. If the resistance value is not between 368k ohm and 512k ohm (normal temperature), replace the Fixing Assembly. 3) If there is no induction between the connector (ACN) at the Fixing Assembly side and the connector (ACH) while the assembly is removed, replace the assembly. 4) Replace the Engine Controller PCB.
- Code: E004 0000
- Description: Fixing assembly drive circuit failure
- Solutions: 1) Reconnect the connector on the Engine Controller PCB. 2) Check the source of power supply for the printer. When using the power supply from the power generator and the like, improve the source of power supply. Note: If the frequency of power supply is not the specified range (40Hz to 70Hz), the fixing temperature control is not executed normally, so this might cause the damage. 3) Replace the Engine Controller PCB.
- Code: E012 0000
- Description: Black drum motor error (Failure in drum motor initial operation) The target speed was not reached within a specified time after startup of the motor.
- Solutions: 1) Reconnect the connector on the Main Motor 2) Replace the Engine Controller PCB.
- Code: E012 0001
- Description: Black drum motor error (Failure in drum motor rotation) The motor rotated out of the target speed during rotation after the target speed was reached.
- Solutions: 1) Reconnect the connector on the Main Motor 2) Replace the Engine Controller PCB.
- Code: E014 0000
- Description: Fixing Motor initial operation error
- Solutions: 1) Reconnect the connector on the Fixing Motor 2) Replace the Fixing Motor
- Code: E014 0001
- Description: Fixing Motor rotation error
- Solutions: 1) Reconnect the connector on the Fixing Motor 2) Replace the Fixing Motor
- Code: E066 0000
- Description: Environment sensor failure
- Solutions: Replace the environment sensor.
- Code: E06F 0068
- Description: EEPROM access failure
- Solutions: Replace the EEPROM.
- Code: E100 0000
- Description: Optical Unit malfunction
- Solutions: 1) Reconnect the connector on the Laser Scanner Unit. 2) Replace the Laser Scanner Unit.
- Code: E110 0000
- Description: Optical assembly error (Scanner motor initial operation failure)
- Solutions: 1) Reconnect the connector on the Laser Scanner Unit. 2) Replace the Laser Scanner Unit.
- Code: E196 0000
- Description: DCON error
- Solutions: 1) Replace the Engine Controller PCB.
- Code: E196 0003
- Description: An Engine Controller which is not compatible with the Main Controller has been detected.
- Solutions: Replace the Engine Controller PCB.
- Code: E245 1011
- Description: Host machine FRAM write error
- Solutions: Replace the host machine FRAMs 1 and 2.
- Code: E245 1012
- Description: Host machine FRAM write error
- Solutions: Replace the host machine FRAMs 1 and 2.
- Code: E245 1013
- Description: Host machine FRAM write error
- Solutions: Replace the host machine FRAMs 1 and 2.
- Code: E245 1021
- Description: Host machine FRAM write error
- Solutions: Replace the host machine FRAMs 1 and 2.
- Code: E245 1022
- Description: Host machine FRAM write error
- Solutions: Replace the host machine FRAMs 1 and 2.
- Code: E245 1023
- Description: Host machine FRAM write error
- Solutions: Replace the host machine FRAMs 1 and 2.
- Code: E245 2012
- Description: FLASH write error
- Solutions: Replace the FLASH PCB.
- Code: E245 2022
- Description: FLASH write error
- Solutions: Replace the FLASH PCB.
- Code: E602 0001
- Description: Insufficient HDD capacity
- Solutions: Replace the HDD.
- Code: E602 0002
- Description: Bootable load failure A Bootable CD was not contained. A Bootable CD was damaged.
- Solutions: Burn the Bootable CD again.
- Code: E602 0006
- Description: Bootable load failure A Bootable CD was not contained. A Bootable CD was damaged.
- Solutions: Burn the Bootable CD again.
- Code: E602 0007
- Description: The contents cannot be detected.
- Solutions: Create Bootable again.
- Code: E602 0008
- Description: There is not enough free space in the alternative block of NAND Flash
- Solutions: 1) Start service mode. 2) Clear the error from the service mode menu. 3) Reboot the machine to stop the error code. 4) Export the user information from the old NAND Flash. 5) Replace the Controller Board. (Change the NAND Flash.) 6) Import the user information to the new NAND Flash.
- Code: E602 0009
- Description: The power supply was interrupted due to power failure or disconnection of the power plug. The MEAP area in the Flash ROM (NAND ROM) became read-only and cannot be written. MEAP cannot be started.
- Solutions: Initialize the MEAP area in Flash ROM (NAND ROM) by enabling the MEAP recovery menu from service mode or special management mode and rebooting the machine. Since the installed MEAP applications and their management information are all cleared, MEAP needs to be reinstalled.
- Code: E602 1102
- Description: /APL_MEAP error (The file systemcannot be initialized properly.)
- Solutions:
- Code: E602 1112
- Description: /APL_MEAP error (device access error EROFS)
- Solutions:
- Code: E602 1113
- Description: /APL_MEAP error (device access error EIO)
- Solutions:
- Code: E602 1302
- Description: /APL_KEEP error (The file systemcannot be initialized properly.)
- Solutions:
- Code: E602 1312
- Description: /APL_KEEP error (device access error EROFS)
- Solutions:
- Code: E602 1313
- Description: /APL_KEEP error (device access error EIO)
- Solutions:
- Code: E602 1602
- Description: /APL_CDS error (The file systemcannot be initialized properly.)
- Solutions:
- Code: E602 1612
- Description: /APL_CDS error (device access error EROFS)
- Solutions:
- Code: E602 1613
- Description: /APL_CDS error (device access error EIO)
- Solutions:
- Code: E604 0000
- Description: Memory capacity error ?(Lack of memory capacity?)
- Solutions: Check the memory capacity inserted to each slot.
- Code: E616 0001
- Description: Installed MEAP applications have been deleted.
- Solutions:
- Code: E721 0001
- Description: Printer engine which is not supported by the controller is connected.Printer engine of a different model is connected.
- Solutions: Connect with the printer engine appropriate to the model.
- Code: E730 C000
- Description: The memory cannot be obtained at initialization.
- Solutions: Turn OFF and then ON the power.
- Code: E730 C001
- Description: An error occurred when accessing the HDD.
- Solutions: Turn OFF and then ON the power.
- Code: E730 D000
- Description: The memory cannot be obtained at initialization.
- Solutions: Turn OFF and then ON the power.
- Code: E730 D001
- Description: An error occurred when accessing the HDD.
- Solutions: Turn OFF and then ON the power.
- Code: E733 0001
- Description: Error in printer communication (illegal communication after establishing communication, parity error)
- Solutions: 1) Turn OFF and then ON the power. 2) Replace the Engine Controller PCB.
- Code: E733 0003
- Description: Error in printer communication (mismatch of country setting)
- Solutions: 1) Turn OFF and then ON the power. 2) Replace the Engine Controller PCB.
- Code: E733 0004
- Description: Error in printer communication (undefined command error)
- Solutions: 1) Turn OFF and then ON the power. 2) Replace the Engine Controller PCB.
- Code: E733 0006
- Description: Error in printer communication (unknown communication error)
- Solutions: 1) Turn OFF and then ON the power. 2) Replace the Engine Controller PCB.
- Code: E740 0002
- Description: An invalid MAC address has been detected.
- Solutions: 1) Check the Mac address. 2) Write the address to the Mac address. 3) Replace the board.
- Code: E740 0004
- Description: LAN Controller Chip access error
- Solutions: 1) Check around the LAN Chip. 2) Replace the board.
- Code: E744 0900
- Description: Model code mismatch
- Solutions: Change to proper bootable. Check the supported series or model of the firmware, and burn the correct series or model of firmware. Replace the Main Controller Board.
- Code: E744 1000
- Description: Mismatch of the series or model of the firmware sent at the time of downloading
- Solutions: Change to proper bootable. Check the supported series or model of the firmware, and burn the correct series or model of firmware. Replace the Main Controller Board.
- Code: E744 1100
- Description: Falsification of the Main Controller Board has been detected.
- Solutions: Change to proper bootable. Check the supported series or model of the firmware, and burn the correct series or model of firmware. Replace the Main Controller Board.
- Code: E748 2012
- Description: Failed to rewrite due to no more alternative block of Flash ROM (NAND) available.
- Solutions: Replace the Controller board.
- Code: E748 4000
- Description: G-Chip loopback ended in timeout.
- Solutions: Replace the Main Controller
- Code: E748 4020
- Description: Unknown device has been detected on PCI.
- Solutions: Replace the Controller board.
- Code: E760 0000
- Description: CPU exception occurred.
- Solutions: Turn on the power again.
- Code: E805 0001
- Description: Fan1 failure
- Solutions: Replace the Fan1
- Code: E805 0002
- Description: Fan2 failure
- Solutions: Replace the Fan2
- Code: E808 0001
- Description: Low-voltage power supply failure
- Solutions: Replace the Low-voltage power supply unit.
About Canon Servie Tool V5610
– Canon Service Tool V5610 is a tool used to perform maintenance on Canon printers and reset Canon printers after replacement of parts such as replacing ink absorbents, print heads, printer mainboard, and others. Based on the many cases we have encountered, the Service Tool is most often used to reset ink absorber counter value when the waste ink absorber is full.
– The ink absorber is going to be full of box, it has to be replaced or cleaned the waste ink absorber. Also, replaceing or cleaning the waste ink absorber, you need to repair or reset the waste ink counter value, cause those parts are concerned to each others.
– So using Canon Service Tool V5610 to reset the waste ink counter value becomes effective when the ink absorber is replaced or cleaned.

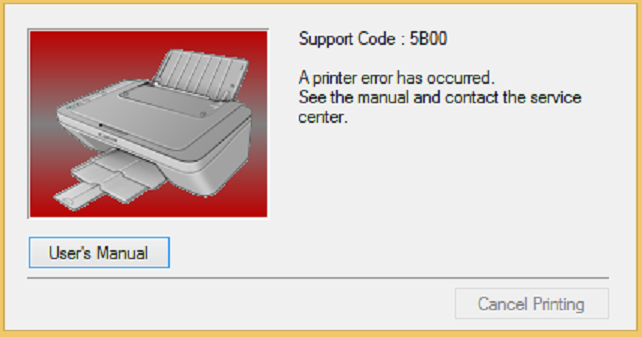
– Canon Service Tool V5610 can use to fix error code 5B00, 5B02, 5B04, 5B14, 1701, 1702, 1700 on your printer. You must enter Service Mode on your printer to use this Canon Service Tool.
– If the printer can not enter Service Mode, you can not reset it by Canon ST V5610. In this case, change EEPROM on the logic board.
Canon Service Tool V5610 Functions
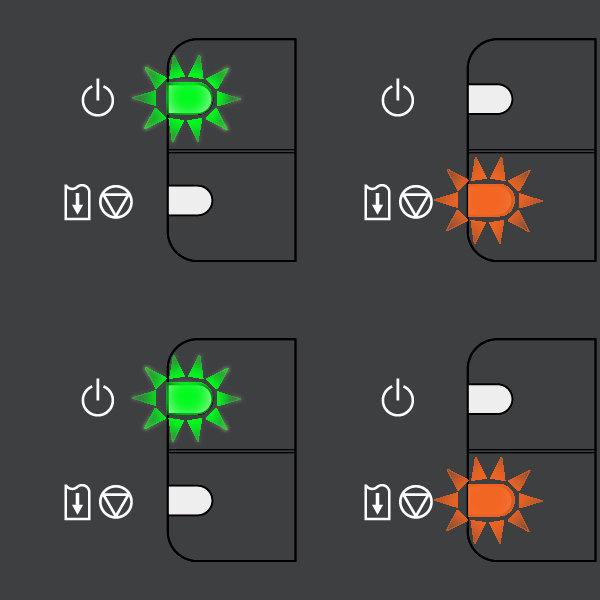
– Fix Canon printer 7 times/ 8 times red light blinking:

– Fix Canon printer error code: 5B00, 5B01, 1700, 1701

Enter Service Mode on Canon Printer
1. Turn off a printer.
2. Press and hold the Resume/Cancel/Stop button.
3. Press and hold the ON button (do not release both buttons).
4. Release the Resume/Cancel/Stop button (do not release the ON button).
5. While holding the ON button, press the Resume/Cancel/Stop button 5 times, then release both the ON and Resume/Cancel/Stop buttons together.
– Canon printer in service mode: computer detects new hardware, led on printer goes green light.
– Download Canon driver and firmware in specific model: https://dnasofts.com/canon-ts9020-printer-driver-firmware-and-user-manual-free-download/
– Download Epson driver and firmware in specific model: https://dnasofts.com/download-epson-c823151-driver-firmware-and-manuals/
Source:
https://chiplessprinter.com/canon-service-tool-v5610.html
https://dnasofts.com
https://shop.nguyendangnam.com/
https://nguyendangnam.me/
https://chiplessprinter.com/reset-epson-waste-ink-pad-counter.html
Contact us to get support with Canon LBP6750dn Error case
Telegram: https://t.me/hyperaktiv
Facebook: https://www.facebook.com/dngnm/

